Thursday, October 31, 2013

Sweet Potato & Brussels Sprout Hash

Here in Baltimore, we are all trying to enjoy the last bits of great fall weather before the bitter cold hits :(  Carolyn decided to host a brunch, and we all eagerly accepted the invite.  We knew there would be awesome food and drinks and great company.  I for one was also determined to soak in any warmth the sun was willing to provide with some roof deck sitting. It ended up being a pretty perfect day out.

The only thing about brunch is that there tends to be lots of super heavy food that usually leaves me with zero energy for the rest of the day.  I very much dislike having to watch what I eat when I'm out, so my solution is usually to bring something that is healthy and filling.  I always eat this kind of stuff on my plate first, get most of the way full, then switch to savoring the other delicious sweet and/or heavy bites at the end.

For brunch, sweet potatoes immediately came to mind, and decided to throw some brussels sprouts in for good measure :)  I made this into sort of a "hash" in hopes that it would pair well with eggs, bacon, etc. It ended up being a great match, really helping to balance out all the flavors at the brunch.  Thanks for hosting, Carolyn!


Sweet Potato & Brussels Sprout Hash

  • olive oil
  • 1 clove garlic, minced
  • 2 shallots, diced
  • 1 sweet potato
  • ~1 lb brussels sprouts
  • 1 handful fresh cilantro
  • 1 handful fresh parsley
  • 1 bunch spring onions
  • sea salt & pepper
Heat up some olive oil in a pan over medium heat.  Saute the garlic and shallots, and season with some sea salt & pepper.

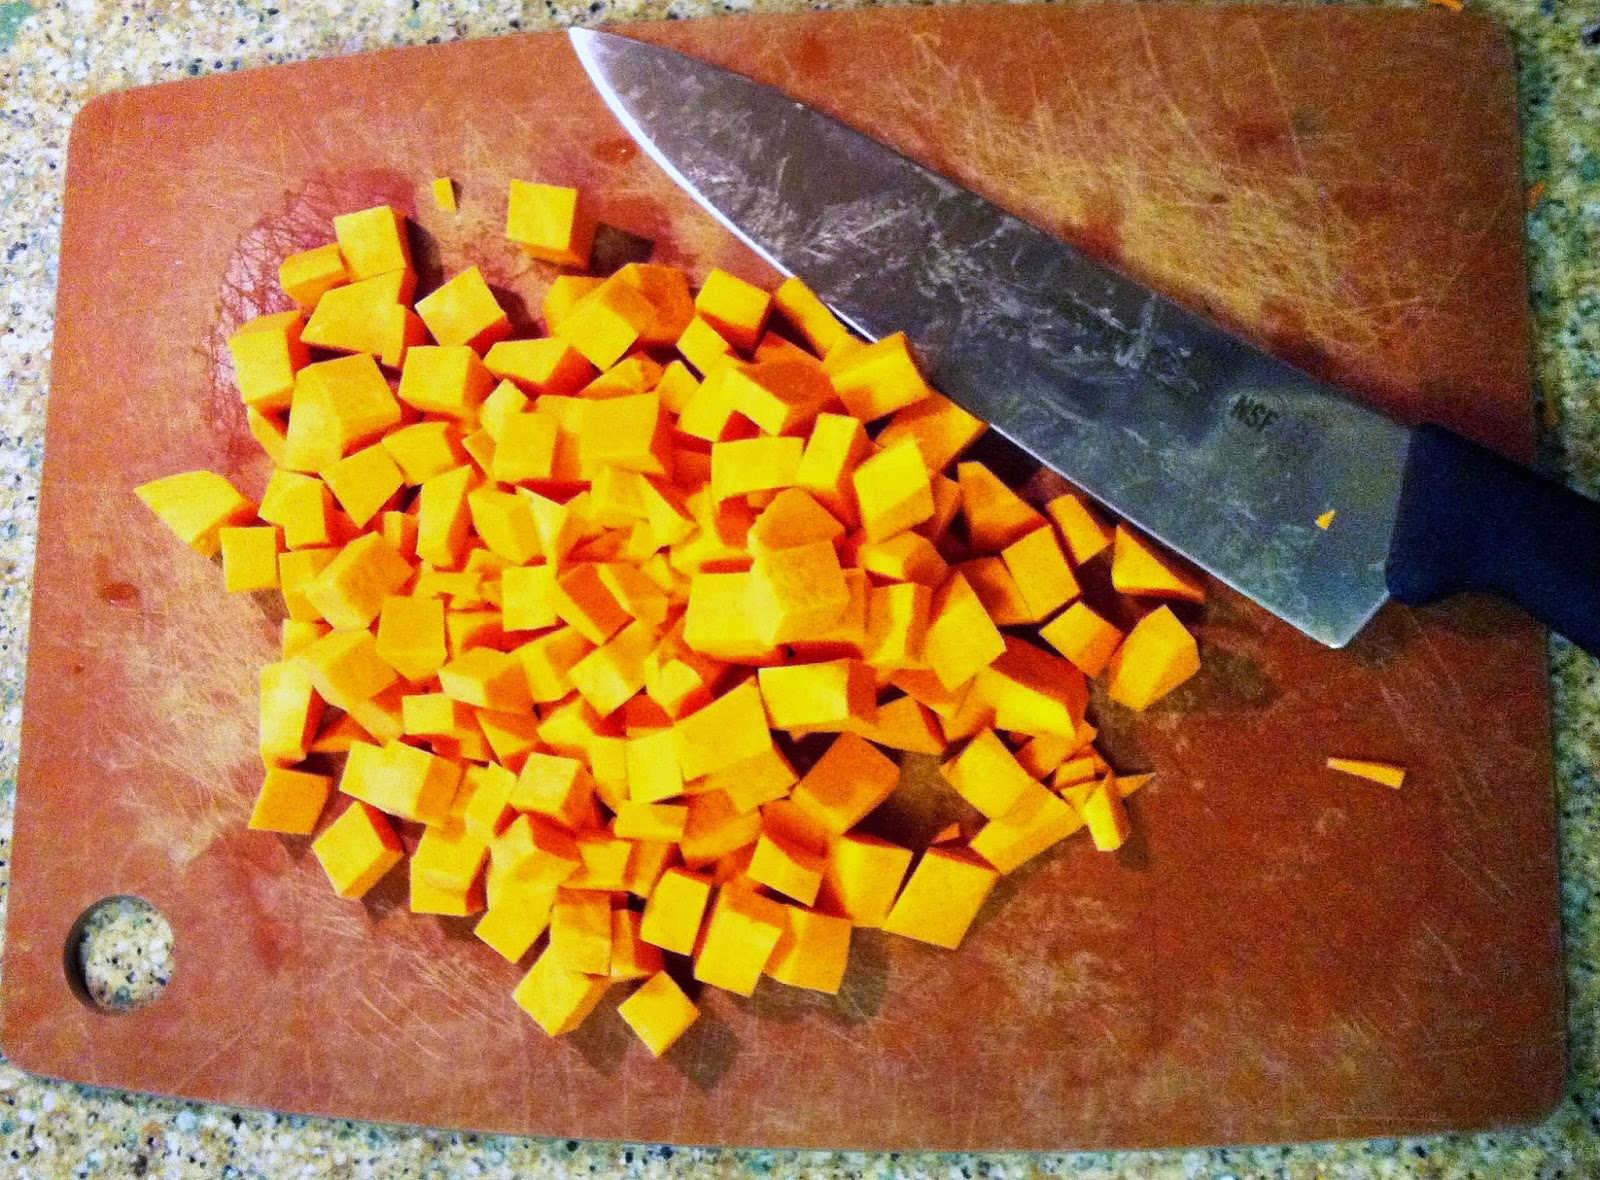
While the garlic and shallots are starting to cook, peel and cut up the sweet potato into small cubes.  The smaller the cubes, the faster they will cook.  Mine were about 1 inch cubes.


Once the garlic and shallots have started to brown just a bit, add in the sweet potato and season with salt & pepper.


Let the sweet potato cook while you cut up the brussels sprouts.  I like to cut my sprouts up into slices, usually about 4 slices per sprout.  This helps them cook quickly, and the smaller size helps each bite of the dish have pretty balanced flavors.


Go ahead and toss them into the mix and give everything a good stir.  Let this all cook for about 10 minutes or so, until some of the brussels sprouts have started to brown a bit, and you can easily stick a fork in the sweet potatoes.


Chop up the cilantro, parsley and spring onions, stir in to the mix, and cook for a minute or two more.

And...enjoy!


Wednesday, October 16, 2013

Shrimp Fried "Rice"

This recipe. Is. Awesome. 

I kept seeing posts on Pinterest and other websites about using grated cauliflower as rice, and I was immediately intrigued.  I love cauliflower just on its own, but I have to say I was concerned that a dish like this would come out with too much of a cauliflower taste - distracting from the traditional shrimp fried rice flavors one would expect.  Luckily, the flavors ended up going together perfectly, and I never would have guessed it was cauliflower by the taste.  I also cringed at the thought of grating cauliflower.  I am not a fan of grating veggies, as it always seems to take so much more time than I expect.  Also, with the cauliflower specifically, I knew I'd later be finding little bits of white veggies in all the nooks and crannies of my kitchen for days.  

Cue the blender.  It worked perfectly for grating the cauliflower into rice-sized bits.  I worked in small batches, and actually did this step a day in advance because I wasn't sure how long it would actually take.  I was pleasantly surprised that this step only took about 5 minutes.


Then I stored the "rice" in an airtight container, lined with a paper towel to absorb any excess moisture.


Here is the full recipe:


Shrimp Fried "Rice"

From The Londoner
  • 1 cauliflower
  • coconut Oil
  • sesame Oil
  • 2 cloves garlic, chopped
  • a few chillies or peppers (I used a sampling from our Crop Share)
  • 2-3 spring onions, chopped
  • soy sauce
  • ~1 lb shrimp (either raw or pre-cooked)
  • 2 eggs
  • 1 bunch cilantro, chopped
  • 1 handful peanuts, chopped
  • sriracha sauce, if desired

"Grate" up the cauliflower in small batches in a blender, and place in a bowl.

Heat up a tablespoon or two of the coconut and sesame oils in a wok if you have one (I used a cast iron skillet).  Once the oil has heated, add the garlic and chillies.

Cook for a few minutes until the garlic has started to brown and your kitchen is smelling awesome.  Add in the "rice" and give it a good stir so that the oils start to absorb into it.

Cook for about 2-3 minutes and then add your spring onions.


If your shrimp is raw, now is a good time to heat up a second skillet with some coconut oil.  Cook your shrimp until no longer pink, and enjoy the delicious coconut shrimp smells!

Back to your "rice" - add in a few tablespoons of soy sauce to get a nice golden color.  Once the shrimp is cooked, add that into the mix.

Make a little well in the middle of your skillet and crack an egg.  Let the egg cook a bit, then give it all a good stir.  Repeat with the second egg.


Place into bowls and serve with cilantro, peanuts and sriracha.  Also, delicious with a Pinot Grigio :)  Buen provecho!


Tuesday, October 8, 2013

Lime, Cucumber & Mint Infused Water

So this post is inspired by large hotel chains I've stayed at across the US -  no, really :)  I travel a lot for work, and in the midst of crazy hours on the job site, long nights programming in the hotel room and the extra stresses that come with being away from home, it seems to be the little things that really help make my time traveling even just a bit nicer.

A lot of the hotels where I've stayed will have an iced water dispenser in the lobby with fresh fruit soaking inside.  It's really nice to have something so fresh tasting and refreshing after a long day, that I decided to bring the concept home.

The hotels usually have oranges, strawberries, lemons, limes, or some sort of combination of these.

Here I've decided to go a step further and infuse some slightly more complex flavors.  I have a pitcher made pretty much exactly for this purpose, as it has a center tube to put your veggies/fruit in with slits to help the flavors infuse.  You could just as easily use a standard pitcher and enjoy the chunks of fruit as you drink :)


Lime, Cucumber & Mint Infused Water

  • 1 Lime (a lemon would be great with this combo as well)
  • 1/2 to a whole Cucumber, depending on size
  • A few sprigs spearmint leaves
Chop up the lime and cucumber into rounds and then half them - this size fits nicely into the center tube.  Tear off the mint leaves and either scrape them while you chop (to help release the mint flavor) or use a mortar and pestle to grind them a bit.


Drop everything into the center tube, layering a bit.


Fill your pitcher with water, twist the center tube on the top, and let everything start to infuse.  Leave the pitcher in the fridge to keep chilled. 

This is an especially refreshing drink after an intense workout, or on a warm afternoon just chilling on the deck :)


Tuesday, October 1, 2013

Tomato, Avocado, Chickpea & Orzo Salad

When I found this recipe online, I immediately knew it would be great for lunches at the office.  At the house, we stock a bunch of the same lunch size Glad® containers, and anytime we make a big batch of food or have leftovers from dinner, we pack it up in these containers in individual sized portions.  That way, when it comes time in the morning to run out the door to work, we can just grab a container and go.  It's also nice to just always buy the same type and size of container, so that you don't have to always try to find the correct lid.  Somehow said lid is always nowhere to be found once you've already put the food in the container, or is that just me? :)

I usually stash a bag of salad and salad dressing in the office fridge (or I pack up some lettuce from home in another Glad® container), so this orzo salad paired with a more standard side salad makes the perfect lunch.  

I also love that this orzo salad is very enjoyable cold and easily transportable, because on particularly nice days - which we've had a ton of lately! - I can quickly sneak away to a nearby park for lunch, get some sunshine and breathe in the fresh air even if just for a small bit.  It helps make the afternoon much more enjoyable.  Also, since I've eaten a very healthy lunch, I don't get the afternoon food coma, desperately wanting to take a nap.  That is something I used to feel like I needed all the time.  Don't get me wrong, I love a good nap, I just don't like the feeling of having to take one.

I love a salad with a beautiful variety of colors and textures.  It makes eating what you've just created so much more enjoyable. 

Tomato, Avocado, Chickpea & Orzo Salad

Adapted from Love & Lemons
  • 1 large tomato
  • Olive oil
  • Sherry vinegar
  • 1 Clove garlic
  • 1/2 C uncooked orzo (I love tri-color)
  • A few handfuls of arugula
  • 1 - 15oz can Chickpeas, drained and rinsed
  • 1 avocado, diced
  • Juice of 1 lemon
  • Handful of fresh basil
  • Handful of fresh parsley
  • Pine nuts
  • Feta cheese
  • Salt & pepper (I prefer sea salt)
Chop up your tomato into nice juicy hunks.  Place in a bowl with a few tablespoons of olive oil, a tablespoon of sherry vinegar, and season with salt and pepper.  Crush the garlic (no need to chop - you'll be taking it out later) and place in the bowl.  Give everything a good stir and let marinate while you prepare everything else.


Cook the orzo according to package directions.  Strain and let cool slightly.

Chop up the arugula a bit, add to a bowl with the chickpeas, avocado, lemon juice, chopped basil and parsley, pine nuts and feta.  The original recipe did not call for feta, but I added it later and it was the perfect addition.  I prefer buying a block of feta and then crumbling it myself with a fork - that way I get nice big hunks and it tastes so much fresher to me than pre-crumbled feta.

Resist the longing looks of your adorable doggie - if you can :)


Once your orzo has gotten a few minutes to cool, mix that in with your greens and chickpea mixture.  Fish out the garlic from your tomatoes and discard.  Drain a good bit of the marinade from the tomatoes and finally mix the tomatoes in to your salad.  Voila!


Three pre-packed lunches - done.  It would have been four, but I couldn't resist immediately chowing down a bit :)